Knowledge Base Articles
- BobCAD-CAM V36
- Getting Setup
- Quick Tips & Tricks
- The BobCAD Basics
- Advanced Topics
- Computer Issues
- NC Editor
- Post Processor
- Our Forum
How to Save out a PDF file in BobCAD-CAM (Print to PDF)
The following guide will show you how to save out PDF files from BobCAD-CAM. These options can also be utilized in other similar software programs to save out the in-software graphics to a PDF file format.
Step-by-Step
Option 1: Microsoft Print to PDF
1. In BobCAD, show the geometry you want to see in the Graphics Area
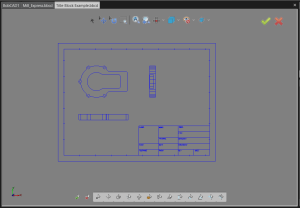
Note: You can find default Title Blocks, similar to the picture above, in the following directory here: C:\BobCAD-CAM Data\BobCAD-CAM V(Current Version)\Examples\TITLE BLOCKS
2. Navigate to File > Print and select "Print Setup"
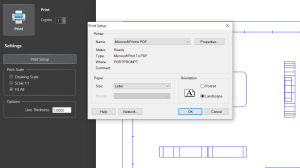
3. Select "Microsoft Print to PDF" in the drop-down box and click "OK"
Note: You can adjust the Page Orientation here as well if needed.
4. Click the "Print" button and Save the PDF to your computer.
If you are issues with Microsoft Print to PDF or the PDF file that got saved is just a black picture, please try to follow two options below.
Option 2: CutePDF Writer
1. Download and install "CutePDF Writer - Free" with the link below
CutePDF Writer - FREE Download here: https://www.cutepdf.com/
2. Open BobCAD and show the geometry you want to see in the Graphics Area
3. Navigate to File > Print and select "Print Setup"
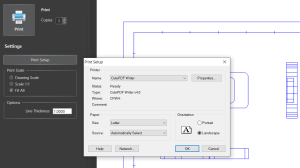
4. Select "CutePDF Writer" in the drop-down box and click "OK"
5. Click the "Print" button and Save the PDF to your computer.
If you want a quick way to snap a screenshot of the graphics area, follow the steps below.
Option 3: Snipping Tool
Snipping Tool is a Microsoft Windows screenshot utility included in Windows Vista and later. It can take still screenshots of an open window, rectangular areas, a free-form area, or the entire screen.
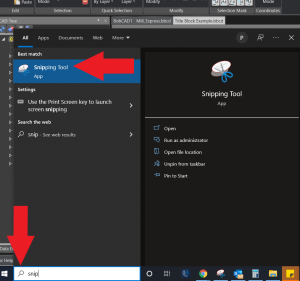
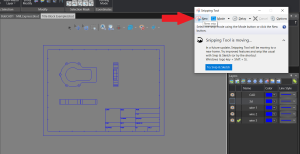
1. "Search" for "Snipping Tool" using the Search bar at the bottom left of the taskbar of your computer. Select the "Snipping Tool" when is pops up.
2. Click the "New" button to start the screenshot.
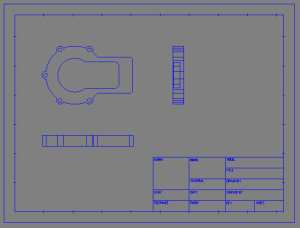
Below is the rectangular box that was selected for the screenshot.
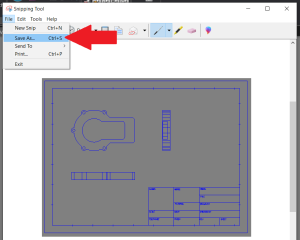
3. Go to File > Save As... to save the picture file to your computer.
If you need further assistance, please contact our support team at (727) 489 – 0003 or [email protected]