Knowledge Base Articles
- BobCAD-CAM V36
- Getting Setup
- Quick Tips & Tricks
- The BobCAD Basics
- Advanced Topics
- Computer Issues
- NC Editor
- Post Processor
- Our Forum
Set Default DNC Settings in NC Editor
This step-by-step guide will show you how to set up default settings for the DNC / RS232 Communications inside of NC Editor. These settings include; Baud Rate, Data Bits, Delay Character, Delay Line, Discard Null, Flow Control, X on/off values, Parity, Parity Character, Port, Receive/Send Timeout, Remove Comments, Stop Bits among other settings.
These settings can be set up as a default in NC Editor so that you do not have to make changes every time you send or receive a new program to the machine.
NC Editor can be opened by going to the “CAM” tab inside of BobCAD and clicking the “NC Editor” button. You can also right-click inside of the posting window and select, “NC Editor”.
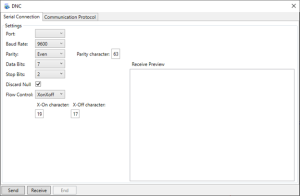
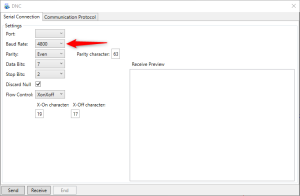
Once NC Editor is opened, go to “Tools” tab > “Start DNC Transfer” to open the DNC Settings dialog (The above image shows the dialog that pops up). This is where you will edit the DNC settings and send or receive programs to your machine
Step-by-Step
Follow the steps below to set up default DNC settings for the above dialog box.
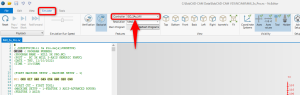
1. With NC Editor opened, observe which “Controller” you are using in the “Simulate” tab. (The Default is typically “ISO_3Ax_Mill”)
Note: The DNC settings are stored inside this “Controller” .CCXML file. The DNC settings can be set up to be different depending on this “Controller” that you have selected for your NC program.
2. Close NC Editor
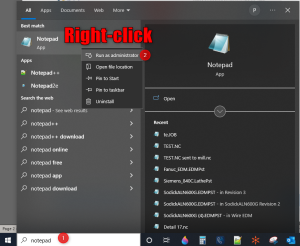
3. In the Search bar of your computer (Bottom Left), type in “Notepad”, then, Right-click on “Notepad” and select “Run as Administrator”.
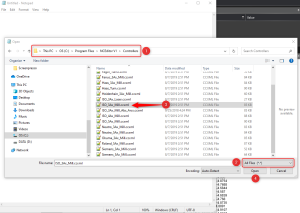
4. In Notepad, go to File > Open and navigate to the following folder: C:\Program Files\NCEditor V1\Controllers . Set the File type to “All Files (*.*)”. Then, select your controller and click “Open”.
5. Once opened in Notepad, Hit CTRL + F to pull up the “Find” tool (If this does not work, go to “Edit” > “Find” at the top toolbar.) Type “DNC”, make sure the Direction is set to “Down” and hit “Find Next”. You will see a line called, “DNCSettings” in the file.
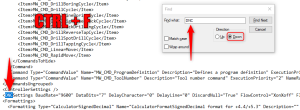
6. Make all necessary changes to the DNC settings on this line in this .ccxml file. You can change the values or if a setting is set to “True”, you can change it to “False” to disable that setting.

7. Once finished, Hit File > Save or CTRL + S to save the changes.
8. Now, reopen NC Editor and navigate back to the DNC Transfer dialog. You should now see the change in the DNC settings.
If you need further assistance, please contact our support team at (727) 489 – 0003 or [email protected]