Knowledge Base Articles
- BobCAD-CAM V36
- Getting Setup
- Quick Tips & Tricks
- The BobCAD Basics
- Advanced Topics
- Computer Issues
- NC Editor
- Post Processor
- Our Forum
Material Library Example
Break
Introduction
This example with explain the Stock Material Library.
Break
Stock Material Library
The Stock Material Library contains all of the information for the available stock materials. You can create and modify the Material Groups which contain multiple Material Types. Material Types can also be created, modified, and added to the Material List. The Material List groups the materials by grade and lists them in alphabetical order.
The feeds and speeds for each Material Type are fully adjustable, and these parameters are set in the Stock Material Feeds and Speeds dialog box which is displayed when you click Add Material or Modify Material in the Stock Material Library dialog box.
All jobs contain a Stock Material item in the tree that defines the stock material from which the part is cut. The selected material type is used for automatic feeds and speeds calculations in the CAM Wizards.
Break
Navigation
To access the Stock Material Library, do one of the following:
- In the CAM Tree, right-click
 CAM Defaults, and click Material Library.
This method is used when you want to create or modify the stock materials and/or the speeds and feeds of a material.
- In the CAM Tree (under Stock or Sheets), right-click the current
 Material Name, and click Edit.
To set the default Stock Material for the job:
- Select the desired material in the Material List, and click OK to close the dialog box and update the material selection.
This method is used to select the Stock Material type that is used for the job. This is done to define what calculations are used in the wizard for automatic Feeds and Speeds.
You can still create or modify the parameters in the Stock Material Library before selecting the desired stock material for the job.
Break
Example
Part 1) Creating a New Material
Break
- Use one of the methods described above to open the Stock Material Library.
Break
Break
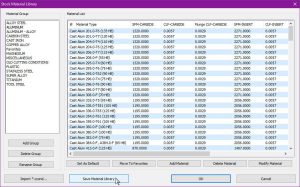
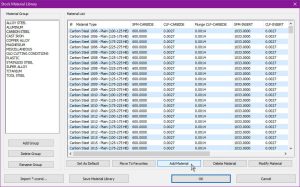
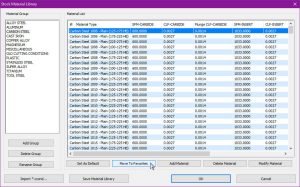
The library opens on the default material group Carbon Steel.Any of the materials in this particular group can be set as default, deleted, or modified by highlighting it, and using the buttons below the list.For this example, however, we will add a new material.
Break - Click Add Material.
Break
Break
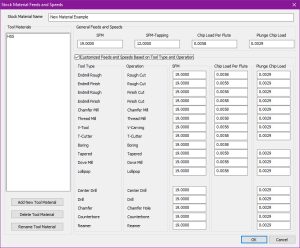
The Stock Material Feeds and Speeds dialog appears.
Break
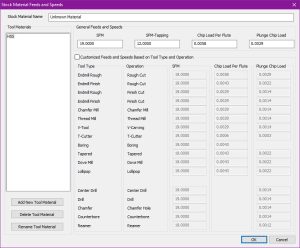
Break - Update the name of the material.
Break
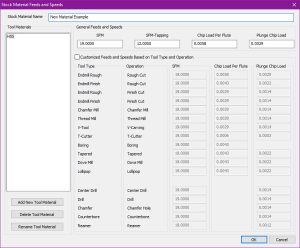
Break - By default, the only Tool Material is HSS (High Speed Steel). Update the SFM, SFM-Tapping, Chip Load Per Flute, and Plunge Chip Load for the new material using a HSS tool.
Break - If necessary, select the check box for Customized Feeds and Speeds Based on Tool Type and Operation.
Break
Break
This allows you to define specific speeds and feeds for each tool type and operation.
Break
Part 2) Adding Tool Material Types
Each type of stock material can encounter many different tool materials. For each material created, you should also create the tool materials this material will encounter, and update the speeds and feeds for each.
Break
- Under the Tool Materials list on the left, click Add New Tool Material.
Break

Break
The Add New Tool Material dialog appears.
Break - Name the new tool material and click OK.
Break
The new tool material appears in the Tool Materials list.
Break - By default, our new tool material is selected to allow us to define its speeds and feeds in our current material.
Break
Repeat the process of setting speeds and feeds for this new tool material type when our New Material Example material is selected for a job.
Break
Break - Repeat this process for all desired tool material types, and click OK to exit this material.
Break
Part 3) Creating Favorites
With each group having so many materials, and every material having so many custom values available, sorting through the library every time you want to grab a material you haven't set as your default can be a little time consuming. To make things easier for you, simply create a Favorites group.
Break
- Highlight one of the materials you use on a regular basis, and select Move to Favorites.
Break
Break
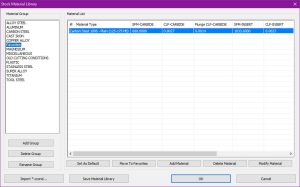
The material is moved to a new group called Favorites.
Break - Click Favorites.
Break
Break
Notice our new Favorites group has only the material we just moved to it.
Break - Repeat this process to place your most frequently used materials in the same group.
Break
Part 4) Saving Libraries to Share
In many cases, companies have several seats of BobCAD-CAM which should be utilizing the same library. Although these libraries do not update each other automatically, it's simple to share this data with other stations after one is updated.
Break
- Click Save Material Library.
Break
Break
The MaterialDB.xml is updated.
Break - Navigate to your installation location and open the Technology folder in your BobCAD-CAM Data folder.
Break
For example: E:\BobCAD-CAM Data\BobCAD-CAM V35\Technology
Break - Locate your MaterialDB.xml file and copy it.
Break
This can be shared with coworkers however you prefer.
Break
Part 5) Importing Libraries
Break
- On the station the library is being imported to, close BobCAD.
Break - Navigate to location of the most recently updated MaterialDB.xml file that was shared with you, and Copy it.
Break - Open the Technology folder in your BobCAD-CAM Data folder.
Break - Paste the MaterialDB.xml in your Technology folder.
BreakBobCAD-CAM can now be opened with the updated library.
That concludes this example.
If you need further assistance, please contact our support team at (727) 489 – 0003 or [email protected]