Knowledge Base Articles
- BobCAD-CAM V36
- Getting Setup
- Quick Tips & Tricks
- The BobCAD Basics
- Advanced Topics
- Computer Issues
- NC Editor
- Post Processor
- Our Forum
How to Create Final Z Level Pass Down to the Allowance
The Issue:
Some customers run into a scenario where they wonder how to get the toolpath to generate at the bottom of floors when roughing out a stock (Such as when using Z Level Rough or Advanced Rough). This scenario typically comes up when roughing out pockets or other floors.
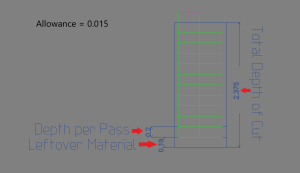
What they find is that the toolpath is not created at the bottom of the floors. It is not in line with the allowance they set. This leaves too much material leftover for the finish pass to clean up as you can see in Pic. 1 (Much more than the Allowance you set.).
In the example below, the allowance set for the job is 0.015, but the leftover material is 0.19.
Pic. 1 – Leftover Material (Advanced Rough & Z Level Rough)
The reason for this has to do with the way our system processes the depth of cut for the feature.
Our system processes the depth cuts from the Top down. In otherwards, we start creating toolpath at the top of the part first and work our way down. The main reason for this is to avoid scenarios where the toolpath may be created too close to the top of the part, causing just a small depth cut at the very top of the stock.
Let’s take picture 1 & 2 for example:
Pic. 2 – Depth Cuts
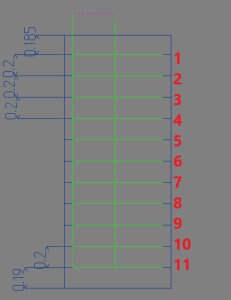
Feature Type: Advanced Rough
Depth of Cut (1): 0.2
Allowance: 0.015
Given the information above, let’s understand why we are getting depths like you see in pic. 2. This is the current way our system processes it, broken down by each pass.
Our reference point is the Top of Feature, which in this case is set to 0
Pass 1 = Depth of Cut – Allowance = 0.2 – 0.015 = 0.185
Note: For Z Level Rough, Pass 1 will not take into account the Allowance and should just show the Depth of Cut
All passes after this use the Depth of Cut until it gets to the bottom of the feature. So, the software checks how far the Bottom of Feature (or bottom of the floor) is based on the reference point & Total Depth. Then, applies the next depth cut if there is room to create it.
Passes 2 – 11 = Depth of cut = 0.2
The system takes the remaining depth and checks to see if it is greater than or equal to the remaining depth. If it is, another pass will be created.
Passes 12: Checks if Remaining depth >= Depth of Cut. So, is 0.19 >= 0.2 ? --> No
No toolpath is created.
As you can see in pic. 2, the remaining depth is only 0.19. There is no way to fit another pass into the toolpath.
This is the way our system processes the depth cuts.
So, you may now be asking, how do I create an additional pass to go all the way down to my allowance of 0.015?
The Solution:
If you own the Advanced Rough toolpath which is part of our 3x Pro Module, this is actually very simple. You just need to enable “Machine Flatlands” located on the “Options” page of the feature (See pic. 3 & 4).
Pic. 3 – Machine Flatlands

Pic. 4 – Toolpath with “Machine Flatlands” enabled
What this toolpath does is create the toolpath like we observed in the previous example, except it adds an additional pass at the bottom of the floors taking into account the allowance of the feature (0.15 in this example) (See pic. 4).
However, if you have don’t have the 3x Pro module, there is still a way to accomplish a similar toolpath using a couple formulas.
What we must do instead, is calculate a Depth of Cut that is equally divisible all the way down to the allowance. We need to get a depth of cut that is close to the desired depth of cut, but is also equally divisible when taking into account the total depth of the job
1)
The first formula we need to use is as follows:
Eq. 1
![]()
To replicate the example above, our Total Depth is defined in pic. 1 as 2.375, our Allowance is 0.015 and our Desired Depth of Cut is 0.2. Using Eq. 1, we get the following:

2)
Next, we need to round up that number to the nearest whole number. In this example, that would be 12.
3)
The second formula we need to use is as follows:
Eq. 2
![]()
*Round up # of Depth Cut Passes to nearest whole number
Using Eq. 2, we get the following:

Note: Do not round up this result. Rounding up in this case would cause the final toolpath to not be generated as it would make the final pass just slightly larger than the remaining leftover material and would hence get the same issue.
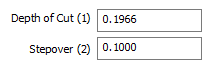
The result of Eq. 2 will give us the Approximate Desired Depth of Cut. We will use this number as our new Depth of Cut (1).
Pic. 5 – New Depth of Cut
Pic. 6 – New Toolpath After being Re-Computed
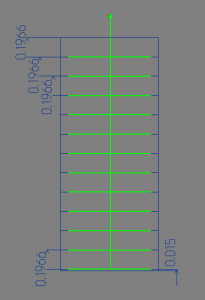
As you can see in pic. 6, Each depth of cut pass is equal to 0.1966. You can also observe that the remaining Leftover Material is equal to 0.015, which is the allowance we had set originally.
Recap:
The Issue: The Toolpath Feature does not create a final toolpath to clean up floors on a model.
The solution: Use the Advanced Rough feature and enable “Machine Flatlands”. If you do not have Advanced Rough, use the equations above to calculate the Approximate Desired Depth of Cut. Then, use that value for the Depth of Cut (1) field in the feature.
If you need further assistance, please contact our support team at (727) 489 – 0003 or [email protected]